
How To Choose Binoculars (Step-By-Step Guide – 2025)
Choosing binoculars is challenging. There are thousands of optics ranging across many price points. Regardless if your hobby is birding, hunting, or something else, this article will help explain the different specifications, technical data, and features of binoculars you need to know before making a purchase.
Quick Links: How to Choose Binoculars
-
The 10 Features/Specifications You Need to Know About!
-
Why are some binoculars so expensive? The 3 Things That Affect Price The MOST.
Most of this post discusses all the confusing numbers and technical data that you are going to encounter as you shop and the reasons some binoculars cost more than a used car.
But first, it’s imperative to mention the most important thing you must do while choosing your next or first set of binoculars.
Test, touch, and feel as many different models as possible!
It’s the only way you are going to know what size you prefer or what’s comfortable to hold in YOUR hands. Just because a particular style of optics is great for your friend does not mean it’s the best for you.
As much as you want to shop online and find the perfect choice without ever leaving your house, my recommendation is to go to a local store that sells optics and test and hold as many binoculars as possible!
The 10 Features/Specifications You Need to Know About!
As you shop for binoculars, it’s inevitable that you are going to read through flashy marketing descriptions designed to convince and persuade you to buy that specific product.
It can be hard to read between the lines of the brochures or salespeople to choose the best binocular for your specific needs. Remember that each company has a mission to sell binoculars, so it’s the sales departments job to make their product sound as appealing as possible.
The purpose of this section is to provide education. I want you to feel confident shopping for and choosing binoculars, and this starts with having a firm understanding of the terms, numbers, features, and specifications you will run across.
*For specific binocular recommendations for birding, try this article*
1. Magnification: The First Number
Every binocular has two numbers in its description. For example, it will show a combination such as 7×42, 10×25, or 8×30.
The first number you read is the magnification. So an 8×42 optic would have a magnification of 8.
Magnification is the number of times an object is magnified through the binocular.

My recommendation: Try to pick binoculars that have a magnification between 7-10x. Anything above 10x typically provides so much magnification that the image will appear shaky because you can’t hold the binoculars still enough without a tripod.
If you do want magnification above 10x, then skip a binocular and just buy a spotting scope and tripod!
2. Objective Lens Diameter: The Second Number
The second number in a binocular description is the diameter of the objectives lens measured in millimeters (mm). So a 10×42 binocular would have an objective lens diameter of 42mm.

The objective lens is the not the one closest to your eyes; it’s the lens closest to what you are viewing.
The size of the objective lens is important because it’s responsible for the amount of light that flows through your binocular. As the objective lens gets bigger the more light that enters the binocular. And more light is good because it allows you to see better colors and brighter images.
My recommendation is to look for binoculars between 30 – 42mm. One problem with a larger objective lens diameter is that it increases the overall weight. I like optics between 30mm and 42mm because they seem to hit a sweet spot between performance and size.
Objective lenses below 30mm are typically considered compact binoculars because they are smaller and lighter, which also make great binoculars for children!
3. Field of View: The visible area seen through your binoculars.
Field of View (FOV) is simply the visible area seen through your binoculars as you look through them. Think of FOV as the amount of action you can see looking through your optics!
Having a small field of view while watching birds or animals can be frustrating because it’s easy to lose track of them as they move.

Field of View is measured at 1,000 yards.
Important Tips To Know About FOV While Choosing Binoculars:
1. In general, Field of View will decrease as the magnification increases. Make sure to compare FOV among similar magnifications.
2. With that being said, Field of View tends to vary widely even with optics with the same magnification. This feature is ultimately the result of the engineering, quality, design, and length of that specific model.
For example, look at the comparison table for the three different binoculars below. They all have the same magnification and objective lens diameter, but vastly different fields of view (and prices!).
-
Zeiss Victory SF 8×42: Field of View = 444 ft / 1,000 yds
-
Leica Trinovid HD 8×42: Field of View = 372 ft / 1,000 yds
-
Nikon Monarch 5 8×42: Field of View = 330 ft / 1,000 yds
3. Field of View is not related to the size of the objective lens diameter!
4. Some manufacturers will give the Angle of View instead of the Field of View. They represent the same thing, but you will need to convert the Angle of View to Field of View. To do this, multiply the angle by 52.5. For example, if the Angle of View is 8 degrees, the FOV would be 420 feet. (8 x 52.5 = 420)
4. Close Focus:
Close Focus is a measure of how close you can get to your subject (e.g., bird, butterfly) and still be in focus and get a clear picture.

The smaller you can get your close focus, the better! Typically anything under 6.5 feet (2m) is considered good. But once again, it’s best to compare this number with binoculars that have the same magnification.
5. Roof vs. Porro Prisms:
When choosing binoculars, you have two different prism styles you can pick.
Porro Prisms:

When light enters the lens, it does a zig-zag through the binocular to get to your eye. These prisms were standard until Roof prism binoculars were introduced.
- The most significant advantage of a Porro prism is that they are cheaper to manufacture than roof prisms, which means you can get a higher quality binocular for the same price.
- The disadvantage is that Porro style binoculars are more cumbersome, clunky, and awkward to carry around! I think they look very old-fashioned and out of style. I have a hard time even finding Porro style binoculars for sale anymore.
Roof Prisms:

Roof prisms allow light to go straight through the binocular barrels to your eyes. Although roof prisms are more compact, streamlined, and smaller than Porro prisms, they are more complicated internally.
- Highly Recommended: Most hunting and bird watching binoculars will be a roof prism design. They are much easier to carry around and use. They fit in your hand much better and weigh less and Porro prism binoculars.
6. Waterproof and Fog proof:
- Waterproof: Most companies use this term to mean that water can not enter. Usually, they will indicate how far or long underwater they can go before there could be a problem. Make sure the binocular is Waterproof and not just weatherproof.
- Fog proof: To prevent your lenses from fogging up in moist or humid conditions, your binocular needs filled with dry nitrogen (or argon) gas instead of oxygen. Many times the description will say “nitrogen purged” or “nitrogen filled.”
7. Ease of Focus:
There is nothing more frustrating when a bird lands a few feet in front of me, and I can’t focus my binoculars fast enough before it flies away! Every optic focuses a bit different, so how easy it is to focus is important to consider.
My preference is to use binoculars with one central focusing knob that is positioned comfortably under my index finger. You don’t want to miss any action while messing with the focus.
Is it easy and smooth to focus or difficult and stiff? Can you focus quickly?
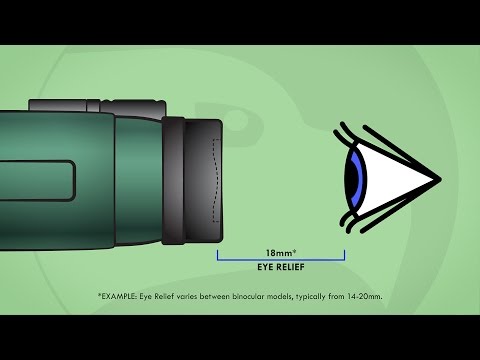
8. Eye Relief:
Eye relief is the distance that a binocular eyepiece can be held away from your eye and still see the whole Field of View. If you wear glasses, eye relief is essential to consider when choosing binoculars.
I’m not very good at explaining eye relief. For a much better and detailed explanation, check out the following video:
9. Warranty:
Before you spend your hard earned money on an expensive binocular, consider if a warranty is included.
In my opinion, a warranty is a reflection of how confident a binocular manufacturer is of their product. Do they have faith in their engineering? Will it hold up to the rigors and stresses of birding, hunting, or other outdoor uses?
Make sure to understand the warranty because each company is different. Here are a few things I have found:
- Some warranties are voided if the product isn’t registered within 30 days or if proof of purchase can’t be provided. Check the fine print.
- Many companies offer a “Lifetime Warranty” for manufacturer defects, but that doesn’t include accidental drops or falls that you cause.
- It’s also common to see warranties for accidental damage that is your fault but only for a limited time. For example, at the time of this writing Zeiss includes a 5 Year No Fault Policy, which covers any damage caused by regular and intended use!
10. Weight and Feel:

Before making a final decision on bird watching binoculars, it is beneficial to hold it in your hand and test in the field. Ask yourself these questions:
- How much does it weigh? Is the binocular too heavy and will be tiring to carry around all day?
Remember, as the Objective Lens Diameter increases, so do the size and weight of the binocular, which is one reason that 42mm is my preference for diameter size. I think it’s a great combination of image quality and brightness, and the weight is comfortable for me.
If weight is a concern, my recommendation is to buy a more “mid-sized” binocular. Look for an Objective Lens Diameter between 30-35mm.
Why the huge price difference among binoculars?
I am going to give you a quick quiz!
Looking at the specifications of the two binoculars below, try and guess which model is most expensive.

So what do you think?
Looking at this table, you might believe that the Nikon Monarch 7 would be more expensive than the Leica Ultravid HD-Plus. They have very similar specifications, with the Monarch 7 having a better Field of View and Close Focus.
Surprisingly, the Nikon Monarch 7 costs around $500 while the Leica Ultravid HD-Plus comes in at over $2,000.
What is going on here?
Well, the specifications and features of a binocular don’t necessarily affect the price.
So, what does affect the price?
As we have discussed, binocular manufacturers are on a never-ending quest to provide us with a perfect image. Some of the common issue’s consumers experience is the loss of brightness and color, depth of field issues, chromatic aberration, fringing, and crispness. Many of these problems are compounded in challenging light environments such as in the shady woods or during sunrise/sunset.
Many of these problems can be solved or minimized, but that comes with a price.
As a general rule, the more money you spend, the better the image!
The binocular industry is very competitive, and there are many great companies and models on the market. Birding or hunting optics can cost anywhere from $100 to upwards of $3,000. Because the industry is so competitive, you are going to get what you pay for.
I have found there are three things that dictate the image quality and cost of your binoculars.
***Important Note: Most companies don’t reveal much detail when it comes to the below information. These are kept a secret so as not to lose a competitive advantage. For example, Zeiss has been in business for a LONG time. They have perfected their engineering and coatings over many years and are not very willing to share their best practices with other companies!***
1. Type and Quality of Glass and Prism:
The importance of the glass and prism can’t be understated! Think about it; light travels through the lens and prisms to reach your eye.
A whole post could be dedicated to the science that happens inside a binocular and how the glass affects the image. Until that happens, here is a summary of what you need to know when choosing a binocular!
BK-7 Prisms vs. BaK-4 Prisms:
- BK-7 Prisms are found in very low priced binoculars.
- BaK-4 Prisms are in most birding binoculars over $100. They have a higher refractive index.
- There is a vast difference in quality among BaK-4 Prisms. For example, some are manufactured in China, and these products supposedly have a lower refractive index than true BaK-4 Prisms. The quality and performance of BaK-4 prisms even vary among different companies because of how they’re engineered.
Types of Glass in the Lens:
- Standard Glass.
- Extra Low Dispersion (ED) Glass:
- This is a high-quality glass that used to be only found in the top binoculars, but now is much more common across all price ranges. One of it’s best benefits is it helps to reduce chromatic aberration – which is the inability of the lens to focus all the colors to a single point, which causes color fringing around the edges of the image.
- Flouride (FL) Glass:
- It is also a type of ED glass, but the lens also contains fluoride. So all FL glass is ED glass, but not all ED glass contains fluoride.
2. Coatings:
As light moves through your binocular, it enters and leaves different glass surfaces and lenses. Each time this happens, about 5% of the light is reflected and lost. This creates a problem when that light is relied upon to make the image bright and clear but only half of it reaches your eye!
Companies have developed complex coatings to apply to the glass to help fix the problem of losing light. These coatings can be as thin as a few millionths of an inch! Every company has their own unique coatings, and there is no industry standard, but here are some of the terms you will see when choosing binoculars.
- Coated: At least one coating on the lens surface. Frequently magnesium fluorite is used. Cheap binoculars!
- Fully Coated: At least one coating on all air-to-glass surfaces.
- Multi-Coated: Have multiple coatings on at least one of the lens surfaces.
- Fully Multi-Coated: All lenses and internal air-to-glass surfaces are multi-coated. This costs the most to manufacture but will let the most amount of light through to your eye.
Dielectric high-reflective multilayer prism coating: I thought it was important to mention this type of coating precisely because it’s found on the prisms of Roof style binoculars and is an excellent coating to have. It can achieve light reflectance that exceeds 99%, which means better and brighter images! Usually, this coating is found on higher priced binoculars.
Phase Correction Coating: This coating is also found on better binoculars and is only needed for roof style optics. A roof surface can cause a phase shift of light, which affects the image. The phase correction coatings help to minimize this occurrence and keep the picture clear.
3. Engineering:
The way a binocular is engineered and designed is going to trump many of the other features mentioned in this section.
For example, a binocular can have the best ED glass available, be fully multi-coated on all lenses, include a dielectric high-reflective multilayer prism coating but still have an awful image when it reaches your eye!! These features are important, but useless if the company that made the binocular did a poor job of putting everything together.
Before making a purchase, I recommend doing some research on the manufacturer and learning their reputation.
How long have they been in business? Are they a leader in the optics industry? Where are the binoculars manufactured (e.g., Germany or China)?
Conclusion – How To Choose Binoculars
We have spent the last 2800 words talking about how to choose binoculars that are perfect for YOU.
To summarize, here are my three recommendations:
- Determine a budget. A decent set of bins can cost as low as $100 and as expensive as $3,000. My guess is that most people fall somewhere in between these two ranges. I think it’s important to understand the aspects of binoculars that affect the price, so you know what you are paying for as you spend more money.
- Most importantly, get out and test as many binoculars as possible! It’s the only way you are going to find one that fits perfectly in YOUR hands. As you look through lots of lenses, it may help determine the amount of magnification you want or field of view you prefer.
