
7 Best DIY Bird Feeder Poles – Plans, Photos, & Videos!
Are you thinking of creating your own DIY Bird Feeder Pole?

Let me first congratulate you on being a dedicated backyard birder! It’s incredible that you’re using your time and creativity for such a great project. =)
I’ve compiled a list of the best DIY Bird Feeder Poles with videos, photos, and plans. I’m positive you can find a design that’s perfect for you!
7 Best DIY Bird Feeder Poles:
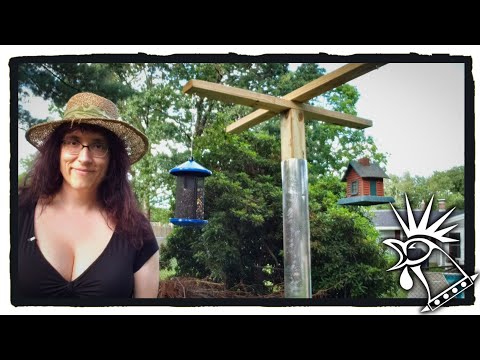
#1. Simple Wooden DIY Squirrel-Proof Feeder Pole
You will need:
- A pressure-treated 4×4 inch post cut to your preferred height
- An 8-foot pressure-treated 2×4 inch board, cut in half widthwise
- Eye screws -> Purchase Here
- Aluminum flashing
- Nails
Basic Instructions:
- Screw the 2×4 inch boards to the top of the 4×4 inch post in a cross shape
- Screw an eye screw into the end of each 2×4 inch board to hang your feeders
- Put the post into the ground, either by digging a hole (at least 2 feet) or using a post holder
- Attach aluminum flashing to the pole using wood nails
This design incorporates one of the most critical elements of any bird feeding setup: it’s squirrel-proof!
Check out the below informative video, which is a full tour of their DIY Bird Feeder Pole. The video is fun and easy to follow, and the design would be simple to replicate and customize.
#2. Steel Pipe DIY Feeding Station
You will need:
- 1-inch Conduit piping – 2 lengths. (whatever your preferred height and width)
- Pressure-treated 4×4-inch block, about 8 inches long
- Concrete
- Wood Screws -> Purchase Here
Basic Instructions:
- Drill holes into the wood block:
- Drill all the way through the block about 2 inches from the top for your cross-post.
- On the opposite end, drill into the wood block about 3 inches for the pole.
- Fit your conduit sections into the holes and screw wood screws through the block to keep them in place
- Bury your post at least 2 feet into the ground and fill the hole with concrete to keep the post secure
This unique bird feeder stand is sleek and simple! It would look great in any yard. Once the initial design is assembled, hang bird feeders directly from the cross-posts, or use hooks.
The video gives a detailed look at how to drill the wood block to assemble the stand quickly and easily. Using concrete to anchor the pole into the ground ensures excellent stability!

#3. Wood Platform DIY Bird Feeding Pole
You will need:
- 1- 2-inch wooden pole in your preferred length
- 2- 1/2-inch wooden dowels in your preferred length
- Cup hooks -> Purchase Here
- Square or rectangular scrap plywood, about 2 feet square
- UV protectant spray paint -> Purchase Here
Basic Instructions:
- Saw the bottom of your pole to create a sharp edge
- Drill a 1/2-inch hole through your wooden pole about 3 inches from the top
- Drill a second 1/2-inch hole perpendicular to the first, about 6 inches from the top
- Fix the flat board to the top of your pole using three wood screws
- Hammer a long nail into one end of each of the dowels (these will be used for feeding fruit)
- Work the dowels into the pole until they’re centered
- Screw a cup hook into the ends of the dowels without nails (these are to hang your feeders)
- Pound the completed feeder at least 1 foot into the ground with a mallet
The design for this DIY Bird Feeding Pole incorporates a platform and cross-posts. You can use the platform as a birdbath, a tray feeder, or a place to offer other treats!
This feeder station is better for small feeders since the pole and cross-posts are thin. I would recommend using feeders that weigh less than 5 lbs. At the end of the video is a neat DIY feeder project, the peanut butter log.

#4. DIY Bird Feeder Pole That’s Under $5!
You will need:
- 1- 10-foot length of electrical conduit
- A large s-hook -> Purchase Here
- A drill with metal and wood bits
Basic Instructions:
- Have your local hardware store bend the end of your conduit at a 90-degree angle about 2 feet from the top of the pole
- Drill a hole through the bent end of the pole about an inch from the end – this is where you’ll hang your hook
- Drill a hole in your deck railing wide enough to thread the pole into
- Pound the pole at least a foot into the ground
If your priority is cost savings, this is the project for you.
The supplies cost less than $5, and it’s quick and easy to complete! This design is threaded through a deck railing, and the bent end of the conduit hangs out over the yard.

#5. Raccoon-Resistant Bird Feeder Pole
You will need:
- A 3-inch wide piece of electrical PVC conduit (as long as you want your pole to be.)
- Five 36-inch iron stakes (found in the rebar section.)
- Drill
- Sledgehammer/mallet
- Manly muscles.
- Spray paint (if desired)
Basic Instructions:
- Cut the PVC pipe to your desired height
- Drill 2 holes on each side of the pipe, using a drill bit that is the same size as the stake
- Repeat, drilling two more holes for the second stake
- Use the edge of the PVC pipe to mark on the ground where the pole will be (and the pole circumference)
- Use the mallet/sledgehammer and drive 3 of the stakes halfway into the ground in a triangular pattern just inside the mark you made with the PVC pipe
- Slip the PVC pipe over the stakes & hammer the PVC into the ground
- Add the last two stakes to the holes at the top of the PVC pole
- Paint if desired
Because of this pole’s smooth, wide design, the creator hasn’t had any issues with her resident raccoons being able to climb up to steal food. But, of course, if you have raccoons, you know how tenacious they can be!
The multi-level cross-posts offer lots of space for feeders. Make sure you bury the PVC pipe deep enough to keep the pole sturdy while feeders are hanging from it.

#6. High-Rise Bird Feeder Pole
You will need:
- A top-mount hopper style bird feeder with mounting kit
- An adjustable painter’s pole -> Purchase Here
Basic Instructions:
- Cement the base end of the painter’s pole into the ground so that it’s steady enough to hold the bird feeder
- Attach the hopper-style feeder to the top end of the painter’s pole with your mounting kit
- Fill the feeder and hoist into the air!
This ingenious design combines the visibility of a super high feeder with the convenience of one closer to the ground. The magic tool that allows this flexibility is an extendable painter’s pole!
The bird feeder attaches to the painter’s pole, and the pole goes into the ground with an auger-style post. Then, when it’s time to fill the feeder, you lower the pole until the feeder is within reach. I love this design because of how simple it is!

#7. Scott’s DIY Pole – BWHQ’s Custom Feeding Station!

Scott’s bird feeding pole at Bird Watching HQ is a fantastic DIY Setup!
He went all-out with his customizations, including a roof, platform feeder, and plenty of space for hanging feeders.
To make his design squirrel proof, he uses a combination of two strategies. First, his post is wrapped with a stovepipe, making it harder for squirrels to grip the pole. He also has a baffle installed.
Check out Scott and his dad building his custom bird feeder pole: (Video sped up!)

Do you have a DIY Bird Feeder Pole?
Tell us about it in the comments!
